
Disclosure: This post contains affiliate links. If you buy through them, we may earn a small commission at no extra cost to you. We only recommend products we have genuinely researched and tested. Prices and availability are accurate as of the publish date but may change.
The Simplest Hydroponic System You Can Build Yourself
Deep Water Culture, or DWC, was the system that finally made hydroponics click for me. After months of reading about nutrient film technique, ebb and flow, and aeroponics, I decided to start with the simplest method available. What I discovered was a system so straightforward that I built my first working DWC bucket for under $30 using parts from a hardware store and a pet shop.
DWC is the ideal entry point into hydroponics. The concept is beautifully simple: plant roots hang directly into a reservoir of nutrient-rich, oxygenated water. No complex plumbing, no timers for flood cycles, no moving water through channels. Just a container, an air pump, an air stone, and a net pot. If you’ve been curious about hydroponics but intimidated by the complexity, this guide will get you growing in a weekend. For a broader look at your options, check out our roundup of the best hydroponic systems for beginners.
What Is Deep Water Culture and How Does It Work?
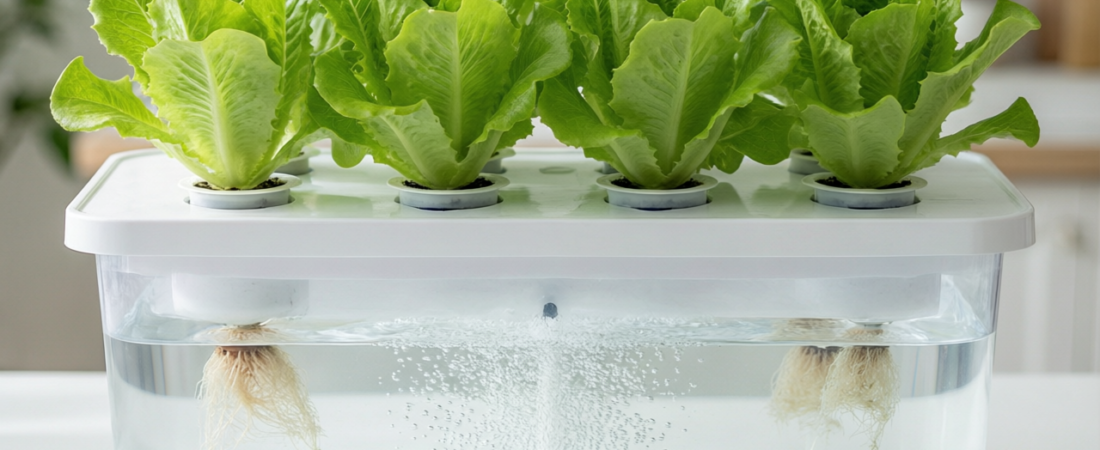
In a DWC system, a plant sits in a net pot filled with growing medium (usually clay pebbles) at the top of a reservoir. The roots grow down through the net pot and into the nutrient solution below. As the University of Georgia Extension explains in its overview of soilless culture, delivering water, oxygen, and dissolved nutrients directly to the root zone is what lets hydroponic plants outperform their soil-grown counterparts. An air pump connected to an air stone at the bottom of the reservoir constantly bubbles oxygen into the water, which serves two critical purposes:
- Oxygenates the root zone: Plant roots need oxygen just as much as they need water and nutrients. Without dissolved oxygen, roots suffocate and rot within hours.
- Prevents stagnation: The constant bubbling keeps the nutrient solution mixed and circulating, ensuring even distribution of nutrients and preventing dead zones.
The water level is set so that when the system is first started, it just barely touches the bottom of the net pot. As roots grow, they extend deeper into the solution. Mature roots develop specialized “water roots” that are white, fuzzy, and highly efficient at absorbing dissolved nutrients.
Why DWC Is Perfect for Beginners
I’ve tried several hydroponic methods, and I always come back to DWC for beginners for these reasons:
- Minimal parts: Five to six components total. No pumps to plumb, no drain fittings, no complex timers.
- Forgiving: Large water volume means nutrient concentration and pH change slowly. You have time to correct mistakes before they become problems.
- Fast growth: Roots have direct, constant access to water, oxygen, and nutrients. Plants in DWC typically grow 30 to 50 percent faster than soil-grown plants.
- Scalable: Start with a single 5-gallon bucket. Expand to a multi-bucket system connected to a central reservoir whenever you’re ready.
- Low cost: A complete DIY DWC bucket costs $25 to $40. Commercial DWC kits run $50 to $150.
Essential Components for a DWC System
Here’s exactly what you need and where to get it:
The Reservoir
A 5-gallon bucket with a lid is the gold standard for single-plant DWC. Food-grade buckets (HDPE #2) are essential; don’t use buckets that previously held chemicals or paint. A new 5-gallon food-grade bucket with lid costs about $5 to $8 at Home Depot or Lowe’s. Dark-colored buckets are better than white ones because they block light and prevent algae growth in the reservoir.
The Air Pump
A standard aquarium air pump works perfectly. For a single 5-gallon bucket, a pump rated for 2 to 4 liters per minute is sufficient. I’ve had great results with the Tetra Whisper Air Pump (around $12 to $18 on Amazon). For multi-bucket systems, you’ll want a commercial linear piston pump like the General Hydroponics Air Pump series ($40 to $80).
The Air Stone
A large air stone or air disc creates fine bubbles that maximize oxygen dissolution. A 2-inch disc air stone costs about $5 to $8 and lasts for years. I prefer disc-style air stones over traditional cylinder stones because they sit flat on the bottom and produce a more even bubble pattern.
Net Pots
A 6-inch net pot is ideal for a 5-gallon bucket. These cost $2 to $5 each. Make sure the pot fits snugly in a hole cut into the bucket lid.
Growing Medium
Clay pebbles (also called hydroton or LECA) are the standard medium for DWC. They’re lightweight, pH-neutral, reusable, and provide excellent support for the plant while allowing roots to grow freely through them. A 10-liter bag costs about $15 to $20 and will fill several net pots. Rockwool cubes work well as a starter medium for seedlings before transplanting into the net pot.
Airline Tubing
Standard 1/4-inch aquarium airline tubing connects the pump to the air stone. About $3 for a 25-foot roll, which is more than enough for several setups.
DIY DWC Setup: Step-by-Step Guide
Here’s exactly how I build a DWC bucket from scratch. Total time: about 20 minutes.
- Cut the lid hole: Using a 6-inch hole saw (about $10 at any hardware store), cut a circular hole in the center of the bucket lid. The net pot should sit snugly in the hole with its rim resting on the lid edge.
- Drill the airline hole: Drill a small hole (1/4 inch) near the edge of the lid for the airline tubing to pass through.
- Assemble the aeration: Thread the airline tubing through the hole in the lid, attach one end to the air stone inside the bucket, and connect the other end to the air pump outside the bucket.
- Place the air stone: Set the air stone flat on the bottom of the bucket.
- Prepare the net pot: Rinse clay pebbles thoroughly until the runoff water is clear (this takes several rinses). Fill the net pot about two-thirds full with rinsed pebbles.
- Plant your seedling: Place your pre-started seedling (started in a rockwool cube or rapid rooter) into the center of the net pot. Fill in around it with more clay pebbles to hold it upright.
- Fill the reservoir: Fill the bucket with water to about 1 inch below the bottom of the net pot. For the first week, the water should just barely touch the bottom of the net pot to wick moisture up to the young roots.
- Add nutrients: Mix hydroponic nutrients according to the label directions for seedlings (usually half-strength). See our complete hydroponic nutrients guide for beginners for detailed recommendations.
- Turn on the air pump: Plug in the pump and confirm steady, vigorous bubbling from the air stone.
- Place the lid: Set the lid with the planted net pot on the bucket. Make sure the airline tubing passes through the small hole.
That’s it. Your DWC system is running. Total build cost: approximately $30 to $40, or $50 to $60 if you need to buy a hole saw.
Best Plants for DWC Systems
Not every plant thrives in DWC, but many do spectacularly well. Here’s what I’ve had the best results with:
Excellent for DWC
- Lettuce and leafy greens: The absolute best DWC crops. Fast-growing, light-feeding, and perfectly suited to constant water access. Butterhead, romaine, and leaf lettuce varieties all thrive. Expect harvest in 30 to 40 days from transplant.
- Basil: Grows explosively in DWC. I’ve had basil plants reach 2 feet tall and produce enough leaves for weekly pesto. Prune regularly to encourage bushy growth.
- Mint: Vigorous and nearly indestructible in DWC. Keep it in its own bucket because the roots will take over.
Good for DWC (with some experience)
- Peppers: Both hot and sweet peppers do well once established. They need more nutrients and support than leafy greens. Use a 5-gallon bucket minimum and provide a stake or trellis.
- Tomatoes: Cherry tomatoes work best in DWC. Use a 10-gallon reservoir for larger varieties. Expect to manage significant root mass and provide strong support.
- Cucumbers: Fast growers that love the constant water access. Provide a trellis for vining varieties.
Poor Choices for DWC
Root vegetables (carrots, potatoes), large fruiting plants, and slow-growing woody herbs like rosemary don’t perform well in DWC. For a comparison of different smart garden approaches, see our Gardyn vs AeroGarden comparison.
Nutrient Management for DWC
Nutrient management is the skill that separates successful DWC growers from frustrated ones. Here’s what I’ve learned through trial and error:
Choosing Your Nutrients
Use nutrients specifically formulated for hydroponics. General Hydroponics Flora Series (FloraGro, FloraMicro, FloraBloom) is the most popular choice and costs about $20 to $30 for a three-part set that lasts months. Masterblend 4-18-38 with calcium nitrate and Epsom salt is a budget-friendly dry nutrient option favored by commercial growers.
Nutrient Strength by Growth Stage
| Growth Stage | Nutrient Strength | EC Target |
|---|---|---|
| Seedling (weeks 1 to 2) | 25 to 50 percent | 0.5 to 0.8 mS/cm |
| Vegetative (weeks 3 to 6) | 75 to 100 percent | 1.2 to 1.6 mS/cm |
| Flowering/Fruiting (weeks 7+) | 100 to 125 percent | 1.6 to 2.2 mS/cm |
Reservoir Changes
I change the entire nutrient solution every 7 to 14 days. Between changes, top off with pH-adjusted water as the plant drinks. If you notice the water level dropping quickly, your plant is growing well. Just add plain pH-adjusted water to maintain the level, and do a full nutrient change on schedule.
pH Monitoring and Adjustment
pH is arguably the most important factor in DWC success. If the pH is wrong, your plant cannot absorb nutrients, even if they’re present in the water. I check pH every 2 to 3 days at minimum.
- Ideal pH range: 5.5 to 6.5 for most crops. Leafy greens prefer 5.5 to 6.0; fruiting plants prefer 5.8 to 6.5.
- Measuring pH: A digital pH meter (Apera PH20, about $50) is the most reliable option. pH test strips work in a pinch but are less accurate.
- Adjusting pH: Use pH Up (potassium hydroxide) to raise pH and pH Down (phosphoric acid) to lower it. General Hydroponics and Technaflora both make reliable pH adjustment products. Add small amounts (a few drops at a time), stir, wait 15 minutes, then retest.
For a deep dive into pH management across different hydroponic methods, read our complete hydroponic nutrients guide.
Common DWC Problems and Solutions
Root Rot
Brown, slimy, foul-smelling roots are the number one killer in DWC. Root rot is caused by Pythium and other waterborne pathogens that thrive in warm, low-oxygen conditions, a problem well documented by horticulture specialists at Iowa State University Extension. Prevention: Keep water temperature below 72 degrees Fahrenheit, ensure vigorous aeration, and keep the reservoir completely dark. Treatment: If you catch it early, remove affected roots with sterile scissors, add Hydroguard or Aquashield beneficial bacteria to the reservoir, and ensure maximum aeration.
Algae Growth
Green algae on clay pebbles or inside the reservoir competes with your plant for nutrients and can clog air stones. Prevention: Use opaque (dark-colored) buckets, ensure the lid fits tightly with no light leaks, and cover any exposed growing medium surface with clay pebbles to block light penetration.
Water Temperature Issues
Water above 75 degrees Fahrenheit holds less dissolved oxygen and encourages root rot. In hot environments, use a small submersible aquarium chiller, freeze water bottles and drop them in the reservoir, or move the system to a cooler location. The ideal range is 65 to 72 degrees Fahrenheit.
Nutrient Burn
Brown, crispy leaf tips indicate nutrient concentration is too high. Fix: Dilute the reservoir with plain pH-adjusted water and reduce nutrient strength at the next change.
DWC vs. Other Hydroponic Methods
| Feature | DWC | NFT | Ebb and Flow | Aeroponics |
|---|---|---|---|---|
| Complexity | Very Low | Medium | Medium | High |
| Startup Cost | $30 to $60 | $150 to $300 | $100 to $250 | $200 to $500 |
| Forgiveness | High | Low | Medium | Very Low |
| Water Use | High per plant | Low | Medium | Very Low |
| Best For | Leafy greens, herbs | Lettuce, strawberries | Versatile | Fast-growing greens |
| Scalability | Bucket by bucket | Channel-based | Table-based | Modular |
DWC wins on simplicity and forgiveness. NFT is better for large-scale lettuce production. Ebb and flow offers more versatility. Aeroponics gives the fastest growth but requires precise maintenance. For your first hydroponic system, DWC is the clear winner.
Recommended DWC Kits vs. DIY
If you’d rather skip the DIY route, several commercial DWC kits are worth considering:
- General Hydroponics WaterFarm ($80 to $100): A well-designed single-bucket system with integrated drip ring and drain. Great for beginners who want a turnkey solution.
- Current Culture Under Current DWC ($120 to $200): Higher-end system with a recirculating design that connects multiple buckets. Excellent build quality.
- Bubble Flow Bucket Kit ($40 to $60): Basic bucket kit that includes the bucket, lid, net pot, air pump, air stone, and tubing. Good value for a no-frills setup.
In my experience, DIY gives you better value and a deeper understanding of how the system works. But if convenience matters more than cost savings, any of these kits will get you growing quickly. For a look at fully automated smart garden alternatives, check out our Click and Grow vs AeroGarden comparison.
Weekly Maintenance Schedule
Keeping your DWC system healthy takes about 10 to 15 minutes per week. Here’s the routine I follow:
| Task | Frequency | Time |
|---|---|---|
| Check water level and top off | Every 2 to 3 days | 1 minute |
| Test pH and adjust | Every 2 to 3 days | 3 minutes |
| Check EC/nutrient strength | Weekly | 2 minutes |
| Full reservoir change | Every 7 to 14 days | 10 minutes |
| Inspect roots for health | Weekly | 2 minutes |
| Clean air stone | Monthly | 5 minutes |
| Check air pump function | Weekly | 30 seconds |
Frequently Asked Questions
Can I leave the air pump running 24/7 in a DWC system?
Yes, and you should. In DWC the air pump must run continuously because the dissolved oxygen it provides is what keeps roots alive and prevents rot. If the pump stops for more than a few hours, especially in warm water, roots can begin to suffocate. I keep mine on a dedicated outlet and check the bubbling every time I walk past the bucket.
How often should I change the nutrient solution?
For a single 5-gallon bucket, do a full reservoir change every 7 to 14 days and top off with pH-adjusted water in between as the plant drinks. Smaller reservoirs and larger plants drift faster, so err toward the 7-day end once a plant is big. A complete change resets both pH and nutrient balance, which is far easier than chasing a badly drifted reservoir.
Why are my plant’s lower leaves turning yellow in DWC?
Yellowing lower leaves usually point to a nutrient issue or a pH that has drifted out of the 5.5 to 6.5 range, which locks out nutrients even when they are present. Check pH and EC first, then confirm your air stone is bubbling strongly. In my experience, most beginner DWC problems trace back to pH drift or weak aeration rather than the nutrients themselves.
Do I need to start seeds differently for DWC?
Start seeds in a soilless plug such as a rockwool cube or rapid rooter rather than soil, since soil will wash into and foul the reservoir. Once roots poke out the bottom of the plug and the seedling has a couple of true leaves, nestle the whole plug into the clay pebbles in your net pot. This keeps the transition clean and lets young roots reach the water quickly.
What water temperature is best for DWC?
Aim for a reservoir temperature of 65 to 72 degrees Fahrenheit. Above about 75 degrees the water holds far less dissolved oxygen and root-rot pathogens multiply quickly. In summer I drop in frozen water bottles or use a small chiller to hold the range, and it makes a visible difference in root color and health.
Final Thoughts
DWC is the system I recommend to every single person who asks me how to get started with hydroponics. It’s cheap, simple, forgiving, and produces results that will genuinely surprise you. My first DWC basil plant grew three times larger than any basil I’d ever grown in soil, and it required less daily attention.
Start with a single 5-gallon bucket and a lettuce or basil plant. Learn to manage pH and nutrients on one plant before scaling up. Once you see the explosive root growth and rapid foliage development that DWC enables, you’ll understand why commercial growers use variations of this technique worldwide.
Build your first bucket this weekend. In 30 days, you’ll be harvesting your first hydroponic crop, and you’ll wonder why you waited so long to try it.